Monday, March 4, 2013

Design Wall Monday 3-4-13

Very similar to last week's photo only I've started adding some details. See the little puppy nose in the top of the photo? He's my buddy and critic. I'm trying to get a good photo of him to print on fabric and add to this piece. So far, though, my little guy isn't being especially cooperative about having his photo taken.

Jump over to Patchwork Times for Design Wall Monday!

Monday, February 25, 2013

Design Wall Monday 2-25-13

After being away for a couple of weeks, I'm getting back into the swing of things with this art quilt piece. The Holiday House I made late last year (shown in an earlier Design Wall Monday posting) has inspired a possible "collection" of houses. This is my take on an Airstream travel trailer. Yet to come will be a beach shack, maybe a log cabin, certainly a haunted house. There are lots of possibilities noodling around in my brain cells. At this point, however, this piece is ready for embellishing, then quilting and finishing. I'm thinking of adding a lounge chair, a grill, a flower pot by the door step, some metal siding features, some tufts of grass. I absolutely love the background batik.

I've also begun playing with fabric painting inspired by a DVD and book by Mickey Lawler - Skyquilts. Both the DVD and book are fabulous. Mickey gives very detailed information about using the fabric paints, mixing colors, achieving certain effects and correcting boo-boo's. Here are my first two pieces. What I learned in the first piece is that the paint colors do, indeed, continue to move and blend and they tend to soften. I used tone-on-tone white fabric that I had in my scrap pile for my first two experimental pieces - once I get a little more time under my belt with fabric painting I'll use the recommended plain white tightly woven broadcloth.

This is try #2. Yep, I have a long way to go ... but it will be a fun journey. Take a few moments to visit Design Wall Monday at Patchwork Times to see all the inspiring and awesome projects others are working on.

Monday, January 28, 2013

Design Wall Monday 1-28-13

I finished this mug rug last week and love it - have it on my desk at work. I have 1 more mug rug to finish with embroidery embellishments. Haven't started anything new. The mood to sew hasn't really been there so I'm not pushing it. I know when the mood strikes I'll be all over it like white on rice ...

Take a few moments to check at Design Wall Monday at Patchwork Times!

Monday, January 21, 2013

Design Wall Monday 1-21-13

Mug Rugs! I love making these little guys. They're super fast, and it's a great opportunity to explore new techniques and stitches without having to make a huge time commitment, and it's a great way to use up fabric scraps. And they keep me busy and out of trouble.

So, I have 4 mug rugs going right now. One is crayon dyed piece - it should be obvious to tell from the photo which one it is - I will be embellishing it a lot with stitching, both by machine and hand, to make the houses and the overall design show up better. The mushroom mug rug is similar to one I saw on Pinterest. The bird/birdhouse is a single McKenna Ryan block I made, just because. And the turquoise/black mug rug with the silver cardinals - well, I was just playing around with that one.

I use these mug rugs at home and at work and really enjoy them.

Take a few photos to visit Patchwork Times today for Design Wall Monday.

Monday, January 14, 2013

Design Wall Monday 1-14-13

Am finally back at it after taking a sewing break over the holidays so I could spend most of my time with my family.

Please visit Patchwork Times today for Design Wall Monday. Even though I haven't been posting the last few Mondays, I have looked at all the lovely and inspiring photos of pieces other quilters are working on.

I actually have several things to report. The Block of the Month quilt is finished. I did not quilt it but instead had it machine quilted by Lilly Lucier in Vanceboro, NC.

This piece is called a "little canvas" that will be a donation to the local arts council. For a fundraiser they ask area artists to submit something, anything, on an 8x10 canvas. In March they hold a banquet that costs $35/person to attend. Each attendee will receive a "little canvas". This is mine. It was definitely inspired by the fabrics!

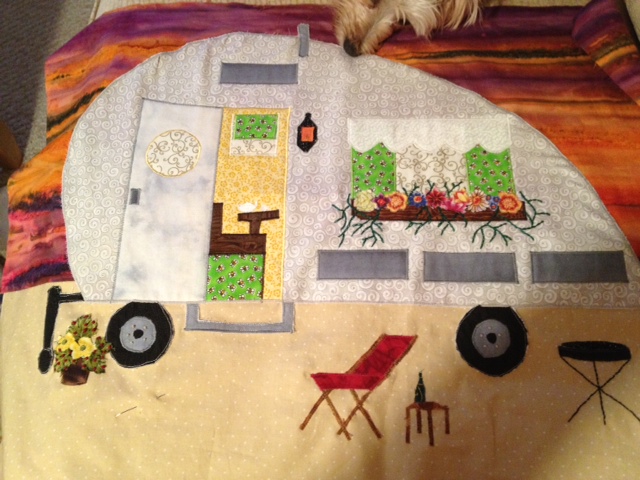
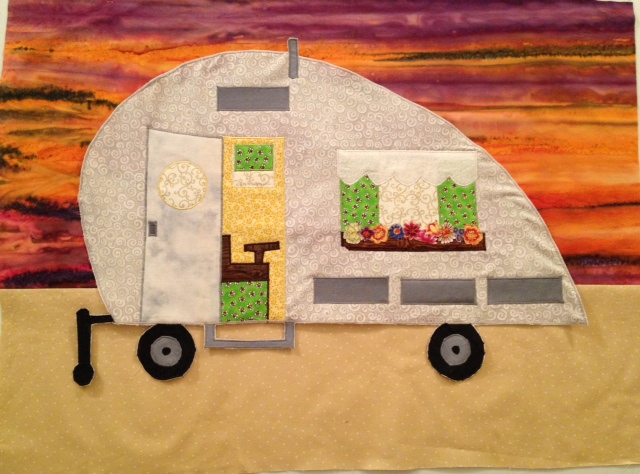
This is the almost finished grab bag challenge piece. Last March the ArtRageous Quilters group, of which I'm a member, issued a grab bag challenge. Each participant put things in a big zip lock baggy. The bags were handed out to other members. We don't know whose bag we received. We have to make a quilted piece around 20" square or so, and have to use 65% of the materials in the bag. The quilted piece we make will be given back to the person who assembled the grab bag. I have to tell you I was not especially happy with the baggy I received because it was mostly upholstery fabrics. They were very difficult to work with because they frayed so badly. Also included in the baggy were some funky yarns and some metallic threads. And to top it off, the color scheme is not my favorite - it was mostly browns and rusts. After listening to me whine about the baggy I received for several months, my friend Lori reminded me that it was, after all, A Challenge! So I worked up a design and here it is. What's left to do is use the metallic threads to accentuate the pupils and add some beads. It's not named yet - am still thinking about that.

I should finish up both challenge pieces this week and start something new for next week's Design Wall Monday.

Happy New Year to all.

Monday, November 26, 2012

Holiday House - how I made it

There was no pattern for this (photos in previous posting). It was totally from my imagination. I used the challenge fabrics to give me some direction as to how I would use them. The white/light fabrics would be snow. The greens would be trees or shrubs. The yellows would be windows. The reds would be curtains and the chimney. I drew in and used crayon and markers for the shingles and front door and steps. I cut out leaves and holly berries from challenge fabrics for the window boughs and door wreath. I also cut out motifs from some of the individual challenge fabrics for tree decorations. Two of the challenge fabrics had snowmen in them and I used one as a door decoration, and one beside the front door although the more I look at him he kinda looks like a "peeping snowman" ... . I used some of the brown-ish tone fabrics for awnings. I used the blue as gingerbread trim around the roof line. One fabric had these really strange Christmas mice on it so I cut out the white fur from the mice and made that snow on one of the trees. The individual components were appliqued and I used a clear thread to secure them to the house. I also used clear thread for the quilting - for the quilting I did a meander on the trees and shrubs and an outline stitch on the shingles and steps and mid-point of the house and the roof line. I added some embroidery trim (french knots, chain stitch for the garland, simple stitching for the candle flames). I added beads as "lights" in the trees and shrubs and the garland, and I also used bead fringe as "icicles". The shape of the piece is the house itself with the trees and steps, so instead of adding a typical binding I just satin stitched around the perimeter and trimmed it close. It's fraying a bit so I may use a very diluted glue around the edge to stop the fraying.

That's it. I have a gazillion ideas for other "houses" like a beach shack, a southern house, a camper, a mountain cabin ... this will be fun. I've been collecting fabrics like wood grains, boards, pebbles, stones, bricks, grass, water, etc. just because I suspected somewhere down the line I would do something like this. Just gotta find the time ...

Design Wall Monday 11-26-12

The guild holiday challenge project is finished ... and the deadline isn't even until Dec. 8th!  But here it is. I've decided to do some additional houses and cottages and bungalows using a similar technique and featuring different seasons of the year (hmm??? Maybe a haunted house??). So, this one is named The Village Collection - Holiday House. It's about 15" x 30" at its widest and longest points.

This was a lot of fun to do; once I started it I became totally absorbed in it. I'm looking forward to making more houses without the constraints of the challenge and being able to use some of the fun fabrics in my stash like the brick, stone, and wood fabrics, however this challenge certainly did make me look at the challenge fabrics differently. Here is a close-up of the bottom right corner. I think the beads add a lot of character to it.

BAM! is ready for the machine quilter (Lilly Lucier, Vanceboro, NC). Am very glad I decided to use black for the sashings and border because the blocks pop. So much of this quilt is comprised of very square patterns so I've chosen a curvy pattern for Lilly to use. And white thread.

Mug rugs seem to be quite popular these days. Here are 6 using motifs left over from a coffee print fabric. I still need to whipstitch the binding, but otherwise they're finished. The bindings are not all the same because I used fabric scraps. The smallest is about 7" square. The largest about 8.5" x 10".

At this point I'm not project-less, but I don't have any new projects actually started. Plenty of ideas, though. And plenty of projects ready to start but will try to wait until after Christmas.

Take a few minutes to visit Patchwork Times today for Design Wall Monday. It's amazing all the spectacular quilts and projects folks are working on.

Monday, November 19, 2012

DesignWall Monday 11-19-12

Please visit Design Wall Monday at Patchwork Times today to see what other creative crafty folks are up to.

Last week I mentioned a soft quilt block book that I'm making. The idea came from an episode of Martha's Sewing Room. My book is about 16" square. I sewed together, then turned, two large pieces of fabric that would yield the size I wanted. I cut a piece of foam core board about 15.25" square and inserted that in the cover, then stitched the center seam, then inserted the 2nd piece of foam core board, and top-stitched the open edge. I also cut 8 pieces of batting that, when folded book style would be about 15-15.25" square. However I got backed into a bit of a corner because once I laid the batting "pages" inside the cover I realized I would not be able to use my machine to sew a center seam - so I hand-stitched this. The applique cover was the very first step. The inspiration came from botannical text drawings. I bought a lovely rose print fabric from Cotton Fields Quilt Shop and fussy cut the roses, fused them to the background and machine appliqued them. Then I statin stitched that to a 2nd background, then satin stitched that to the cover. It took longer to fussy cut the roses than it did to make the entire project! Right now the book is holding all of the pieces for the craftsy.com block of the month quilt that I'm working on.

The other project I'm working on these days is a "challenge" from the Rocky Mount Quilt Guild. We were given 36 charm squares and one "ringer" piece of fabric. The challenge is to make a quilt piece no larger than 30 x 30 using the fabrics provided; we can also add one additional fabric that has to be either white or muslin. Many of my charm squares were duplicates so I had about 26 different fabrics to play with. I immediately started looking for "outs" in the directions! The directions did NOT say I could not dye, color, or paint the fabric. And they did NOT say I had to use ALL of the fabric provided, just some of each fabric. So, I'm making a whimsical holiday house; the "ringer" fabric is being used as a "stained-glass" window in the attic. It's not yet named. I'm to the point now where I need to machine quilt it. One of the guild members recently showed an art piece where instead of using a conventional binding method she simply did a satin stitch outline around the perimeter of her piece and then trimmed the piece close to the satin stitching and that finished her edge. I know it would never do for a show piece but it was a unique and interesting binding technique that I plan to copy for this house. Once you see the final cut out of this house you'll understand why. Once it's machine quilted and the edge is finished, I plan to do quite a bit of beading. Beads can be used for "lights", "snow", and "icicles". Maybe I'll have the piece finished to show for next week's Design Wall Monday. I've already added some embroidery accents. I will probably use a marker to draw in shingles. I'm contemplating also using a marker to lightly draw in "boards" on the house. But then I remember that my friend Lori accuses me of getting too involved in details so I'll mull that one over.

I've enjoyed creating this house and my imagination is swirling with other houses and cottages and buildings that would be fun to make without the constraints of a challenge.

Happy Thanksgiving to all. Safe travels to all who hit the roadways or airways or waterways.

Monday, November 12, 2012

Design Wall Monday 11-12-12

Happy Veteran's Day! Thank you to all who have served our wonderful country.

Please visit www.patchworktimes.com today for Design Wall Monday.

Here are the finished Craftsy.com block of the month blocks - 20 of them. And the sashing strips. I may change out the red sashings and use black fabric instead but I didn't have enough black fabric and was trying to make do with what I had on hand. And while I like this, even though it is quite wild looking, I'm thinking black sashings and borders would make the individual blocks "float" or pop out a bit more. Maybe lend a bit more balance to the quilt. I've named this quilt BAM! After looking at it more, I will definitely audition black sashings before doing any sewing.

On one of the televised sewing shows recently, a guest showed a "book" she made to store quilt blocks that are works-in-progress. What a cool idea! Foam core board is cut and inserted in the back and front covers, and batting makes up the "pages". So, I've started my rendition. On the front cover I'm going to add a floral applique - after looking at it in this photo I thnk I'll curve the corners of the applique to soften it a bit. Maybe next Monday I'll be able to show the finished "book".

This is my sewing buddy. He's a lot of company and makes sure to let me know when I've been sewing too long (in other words, he's tired of being ignored!). Sometimes he even helps by rearranging blocks on the design floor. He's been my buddy for 2.5 years and during that time I don't think there has been a day go by that he hasn't made me laugh out loud.

The Pumpkin Patch - This piece is about 10 x 15, and is crayon dyed. I'm happy with the way it turned out.

For the next Design Wall Monday I hope to have the BAM! quilt top and the quilt block storage book finished. So, till next week ....

Monday, November 5, 2012

Design Wall Monday 11-5-12

Well, I just can't believe it's already November. And between now and the end of the year there is something going on every single weekend so my crafting time will be limited. Please take a few moments to visit www.patchworktimes.com for Design Wall Monday.

I haven't had much time for sewing but have managed to work a bit on two crayon dying projects. I'm at the point on both of these pieces where they need to be quilted but I don't have any clear thread, which is what I want to use. The last time I posted on Design Wall Monday I featured the whimsical flower piece that I call The Ladybug Garden. Several folks asked me for crayon dying directions. I'll go into some detail on that now.

I learned of this technique from the blog www.mamacjt.blogspot.com. Please take a few moments and go to her blog. It's delightful. Her work is so original, whimsical, and fun. Somewhere in her blog she describes her crayon technique in detail. I've played with it as she describes and have adapted it to the way I like to do it. It's very similar to her technique, with the main difference being that I make the quilt sandwich and do the quilting after the outline stitching is done.

Okay - here is the way I do the crayon dying. First, draw your design either on paper to tweak and then transfer to fabric later, or directly onto fabric if you're a confident artist. I have minimal drawing talent so I do simple drawings like The Ladybug Garden (above), or I get designs from stamps I own (the pumpkins) or photos (the fishing cottage) I've taken and have translated into line art using Picasa photo software (free download from Google). Anyway, once the drawing is the way you like it and the size you want, put it on your lightbox and trace it onto fabric. My lightbox is the dining room window. After the design is traced onto the fabric, outline it with a marker - I use a thin black Sharpie. I also mark the detail lines. Iron something like freezer paper or a good stabilizer onto the back of the fabric. Then color! Don't be afraid to blend colors. Don't be afraid to really bear down to get a lot of color on the fabric. On The Ladybug Garden I ironed a pretty heavy-duty stabilizer on the back and left it in place for the outline stitching that comes later. For The Fishing Cottage piece and the pumpkin piece I just used freezer paper. I did make a fun discovery when I did the pumpkin piece above ... textured tone-on-tone fabric adds a delightful design element to the piece. In the pumpkin piece there is a vine design in the fabric that beautifully compliments the pumpkins (I think). A happy accident.

Once you're satisfied with the coloring it's time to iron off the excess wax. There really won't be a ton of wax on the fabric but you will need to protect your iron and ironing surface. I went to our local newspaper and bought an "end roll" of unprinted newsprint- they sell end rolls for $2/inch and for $10 I bought an end roll that is more paper than I'll probably ever use in my lifetime! You can also use old muslin scraps, paper grocery bags, etc. Just iron the piece until no more wax comes off onto the paper.

So, after you've had fun coloring with crayons and the wax has been melted away you're ready for the next step which is outline stitching. Mamacjt does her outline stitching in black, and so have I for the most part, however you can most certainly play around with using other thread colors for the outlining - I used some other colors in The Fishing Cottage piece and am totally delighted with the result. Mamacjt also makes her quilt sandwich prior to adding the outline stitching, so it shows on the back. That doesn't really appeal to me so I do the outline stiching with either interfacing/stabilizer or batting on the back of the piece but not the quilt backing, not yet at least.

I'm very new to machine quilting and the step of adding the outline stitching is an excellent exercise for becoming more familiar and comfortable with free-motion stitching. Don't look too closely at my pieces because you will see that I didn't stay "on the lines" very well. But after the pieces I've done recently I can tell I'm getting better at it!

After the outline stitching I do whatever embellishing I want to add to the design like beading or embroidery - as long as it's not embellishments that would interfere with free-motion quilting. In that case, I will add those type of embellishments after the quilting step is completed. However, if you're hand-quilting this is a moot point. Both The Ladybug Garden and the pumpkin pieces have been embellished and that's where I've stopped at the moment.

After the outline stitching (and maybe some embellishing) is completed, it's ready for quilting. This is where I add the backing fabric and quilt the piece however appeals to me. I typically quilt the background around the design which makes the design pop a bit (I think). Then bind it, add a label, you're done!

I think it's a fun technique and I've totally fallen in love with it. At the ArtRageous Quilters meeting Saturday one of the members demonstrated the crayon technique from the book "Creative Quilts from your Crayon Box" by Terry Linn Kygar. It's a delightful book and her pieces are simply beautiful. Terrie describes her technique as "melt-n-blend meets fusible applique". I'll be attempting some of the exercises from her book soon.

I hope you'll give this technique a try.

Monday, October 22, 2012

Design Wall Monday 10-22-12

Unbelievable that October is winding down. It's scary how fast the rest of 2012 is zipping by.

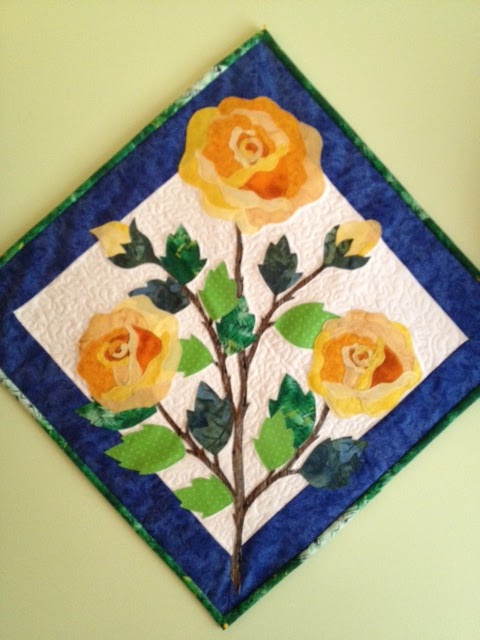
Mamacjt's blog features her various art quilts and activities. One of her techniques that she uses on a frequent basis is crayon dying. I've done a few projects using this technique and love it. It's very easy to do. In a nutshell you transfer a design to fabric using pencil, then outline with a sharpie marker, then color it with crayons, then melt the wax away using your iron and leaving behind beautiful color. At this point mamacjt uses black thread to outline stitch the design as well as the details. I've used other color threads to add detailing and it is a very nice effect. Finally the piece is quilted and embellished using embroidery, buttons, beads ... whatever you like. I'm to the point with this piece where it's time to melt the wax and set the color into the fabric. I definitely see beads and embroidery on this piece, and maybe even buttons if I find some I like. As far as quilting goes, I think I will stiple quilt all the white space to make the design areas pop out a bit. I'm calling this piece The Ladybug Garden. (for some reason I'm having trouble creating the link to mamacjt's blog but it is www.mamacjt.blogspot.com)

And while I was working on this piece I started noodling around an idea for a small Halloween/autumn piece featuring pumpkins ...

Jump over to Patchwork Times today for Design Wall Monday to see what other quilters and crafters and artists are working on.

Monday, October 8, 2012

Design Wall Monday 10-8-12

This year I've participated in the Craftsy.com block of the month project. The two blocks for October complete the 20 blocks required for this project. It's been fun but ... I'm not crazy about the color scheme. I knew it was to be a scrappy quilt but it probably would have worked better with a few more colors instead of just white/black/red. It has a very "chopped up" look to it to me. In November the task is to add borders/sashings and in December it is to be finished. I'm putting it down until after the first of the year, though. In fact, I'm putting down most of my crafting and sewing projects until the start of 2013 because I have so much going on around the burrow and work. I've looked and looked at this photo and am thinking that I'll use one of the red fabrics as the sashings and border to try to bring it all together. I'll also really need to mess around with the block placement to make sure it doesn't get too heavy on one side with a single color.

Please take a few moments to visit Design Wall Monday at Patchwork Times. It is a never-ending source of quilting inspiration to me.

Monday, September 17, 2012

Design Wall Monday 9-17-12

Today my son turns 21. My goodness ... where has the time gone? I'm very proud of the man he's become.

Okay - on to sewing. I'm continuing to work on the Christmas wall hanging that I posted about last week. My progress this week has been to finish the bead-loom woven central focal piece - well, I say "finished" but I still have 80 ... count 'em 80 ... thread ends to weave in - then it will be finished. I have the quilt sandwich made and will quilt it and bind it this week. This pattern is actually a cross stitch pattern from Mill Hill Designs that converted quite nicely to a bead loom chart.

The very last step will be to applique the cross-stitched and bead woven "decorations" onto the wall hanging. Thank you to my sister for naming this piece for me ... Deck The Halls.

Thursday night Ruth and Lori came over to my burrow for Needle Nite. We had a blast playing with polymer clay and making buttons. I think it was Lori who casually tossed out the idea of swapping some Christmas fabrics between the 3 of us for a table topper called Crooked On Purpose. Then Saturday we had an impromptu Needle Nite and agreed to move forward with the Crooked On Purpose plan so everyone brought 3 rectangles of 5 different Christmas fabrics. I finished my table topper top tonight! Love it! This week I'll quilt and bind it.

Am continuing to work on the Craftsy.com blocks of the month. 18 are finished so far for January through September. October will be paper piecing then we'll have a 20 block quilt to assemble.

Next I'm hoping to begin working on sweatshirts converted to jackets. These seem to be good candidates for the handmade polymer clay buttons.

Visit Design Wall Monday to check out what everyone else is working on.

Monday, September 10, 2012

Design Wall Monday 9-10-12


Christmas!  This project actually started out innocently enough. I bought a few cross-stitch/bead ornaments kits by Mill Hill Designs from Weaver's Web yarn shop in New Bern. They were fun to do. So then I decided it would be a good idea to think of a way to display them together since individually they might get "lost" on the tree, and considering how much time goes in to stitching and beading each one, I want them to be noticeable.


Then I saw this lovely tone-on-tone Christmas fabric at Cotton Fields Quilt Shop .... well, one thing led to another ... and I decided to make a small Christmas wall hanging onto which these ornaments will be appliqued.

The center ornament, though, is not finished because rather than cross-stitching it, I'm going to use the pattern as a bead loom design (see photo of my new handy-dandy bead loom!) and it will be the focal point of this piece. I'm not married to this exact placement of the ornaments ... still mulling it over but so far I'm okay with it. A lot of time has gone in to this small wall hanging! And a lot of beads.

Other than assembling the September blocks for the Craftsy.com's block of the month club, I haven't done any other sewing.

For Needle Nite this week Ruth, Lori and I are going to venture into the world of polymer clay and try our hand at making some unique buttons. At the ArtRageous Quilters meeting last weekend one of the members brought for show-n-tell some buttons she had made from polymer clay and I fell in love with them! By the way, our meeting was so interesting and inspiring. Christine Zoeller, a professor of textile art at East Carolina University, demonstrated to us some techniques for working with tulle, silk organza, and other transparents fabrics. Fascinating!

Patchwork Times is hosting Design Wall Monday today. Check it out!

Monday, August 27, 2012

Design Wall Monday 8-27-12


This was a fun week. Man oh man, but I've enjoyed having my sewing studio back! This week I finished this little lighthouse piece that I talked about in last week's post - I've named it The Way Home. It's about 16" by 26" and the techniques used were raw edge applique, embroidery, quilting.


Then I did this little piece - it's about 9" square. The idea is from a photo I saw on the internet and unfortunately I don't know to whom to give the photo credit. I'm calling it Country Church. Techniques used were raw edge applique, crayon dying, embroidery, quilting.

Visit Patchwork Times for Design Wall Monday - it's always inspiring to see what others are up to.

Monday, August 20, 2012

Design Wall Monday 8/20/12


Last week's projects are finished - The Fishing Cottage and The Rose. Both were a pleasure to finish. I really enjoyed the crayon technique in The Fishing Cottage and plan to do another project soon using that technique. In fact, the next project is a country church in a night setting and I'm planning to use applique, crayon, and embroidery embellishments in addition to quilting and thread painting - it's a small piece so that's a lot of techniques crammed into a small space.

The completion of these projects obviously means the A/C in the studio was repaired. Whew! I sure missed my sewing machine. In addition to finishing these two projects I also did the August blocks for the Craftsy.com block of the month project and made two ereader pouches. I'm really trying to catch up on lost time. I believe for the Craftsy.com block of the month project there will be blocks for September and October for a total of 20 blocks, and then we'll put the quilt top together. I've used only red, white, and black fabrics in mine. It's pretty wild looking!

Another project I started Sunday and will finish Monday night is this whimsical lighthouse which I've titled The Way Home. The lighthouse design in the book Fanciful Stitches Colorful Quilts by Laura Wasilowski was the jumping off point for this project. I really enjoyed her book - it's a quick read and she has a different way of approaching the applique technique. All that's left to do is the quilting and binding.

Stop by Patchwork Times for Design Wall Monday to see some amazing projects.

Monday, August 13, 2012

Design Wall Monday 8-13-12

Work has been crazy-busy. The the air conditioner in the sewing studio quit working. All of that has affected the amount of time I have had for sewing, especially the broken A/C because in the late afternoon the temperature in that room pushes 100. Pooh!

Anyway, enough whining - the A/C will be repaired this week. In the meantime I've tried to work on projects that didn't require sewing (yet). This is a crayon dyed piece - I took the original photo of a little fishing cottage in my coastal home town. It's a precious little place I simply adore. Using Picasa I had the photo translated to a line art drawing. Believe it or not, I simplified that line art drawing even more to come up with this version. Using a crayon technique I learned from mamacjt's blog, I have colored the piece and have ironed it to permanently dye the fabric. What's left to do is ... a lot! I have to stitch over all the black lines with black thread. I intend to embellish it with embroidery - flowers, crab pots, and other details. Then it will be quilted.

Another project I've been able to work on outside of the sewing studio is this yellow rose wall hanging. The pattern is a Ruth Blanchet Creation distributed by Arbee Designs Ltd. - it's actually a quilt, but I simply do not need another bed size quilt nor is there anyone I need to make a bed size quilt for, so I elected to do just the center motif from the pattern of the rose.

My A/C should be repaired this week, then I'll start catching up on some projects that have been put on hold, like these two pieces, a couple of other art quilt patterns I drew up in my down time, two e-reader pouches, etc. Later this week Lori, Ruth, and I are going to play with sun paints.

Please take a few moments to visit Design Wall Monday at Patchwork Times to see projects other creative quilters are working on.

Monday, July 30, 2012

Design Wall Monday 7-30-12

Wish I had more to show for Design Wall Monday, but this is all. I downloaded a course from craftsy.com called Thread Painting by Lola Jenkins. She uses line art, color pencils and stitching for her pieces. This is my first attempt. I took the original photo of this squirrel in my backyard and using picasa transferred it to a line art drawing. The line art was transferred to a piece of plain off-white fabric. All the color on this piece was added by me either with color pencils or stitching. I don't think it's awful for my first attempt. I have a lot to learn. But it was fun. It's about 8x10 and is called, "You Look At Me?"

Visit Design Wall Monday at Patchwork Times today to see what others are up to.

Monday, July 16, 2012

Design Wall Monday 7-16-12

Thread painting - that is what is on my wall at the moment. I took this photo of an iris in my garden this spring. Using Picasa I tweaked the photo a bit to make the iris the focal point. Then I printed it on fabric - twice. This is my first thread painting attempt and it has been quite a learning experience. First I learned that within minutes I stopped looking at the image and was focusing on the colors. I also learned that the piece looks quite different from a distance and to get a true picture of what the mind is going to see, you simply have to step away from it. At the moment, I've used various colors to outline what I see as the major components of the flower. Now I'm going to mull it over and see what I want to do next. On Quilting Arts I had seen one of Pokey's guests demonstrate thread painting and she set the machine to zig-zag as well as free-motion. I tried that first and did not like the result I got. Even with a heavy-weight stabilizer on the back the piece was puckering badly. At that moment I was quite glad I had the foresight to print the photo twice because I tossed the first attempt in the trash and tried again with my machine set to straight stitch.

I can see where even if I never develop the talent of thread painting, the exercise itself would certainly help me develop better control of my sewing machine for free-motion quilting. Anyway, I'm having fun with it. I don't know what else I will do to the flower but I will do more. I plan to densely quilt the background with green thread. Then I'll simply bind it and it will be a wall hanging and a nice reminder of this lovely flower.

Another Journey is finished. I'm happy with it. I have another idea for a wall hanging noodling around in my head, but a hectic work schedule and a few days of vacation following that will take me off the sewing trail for a short while.

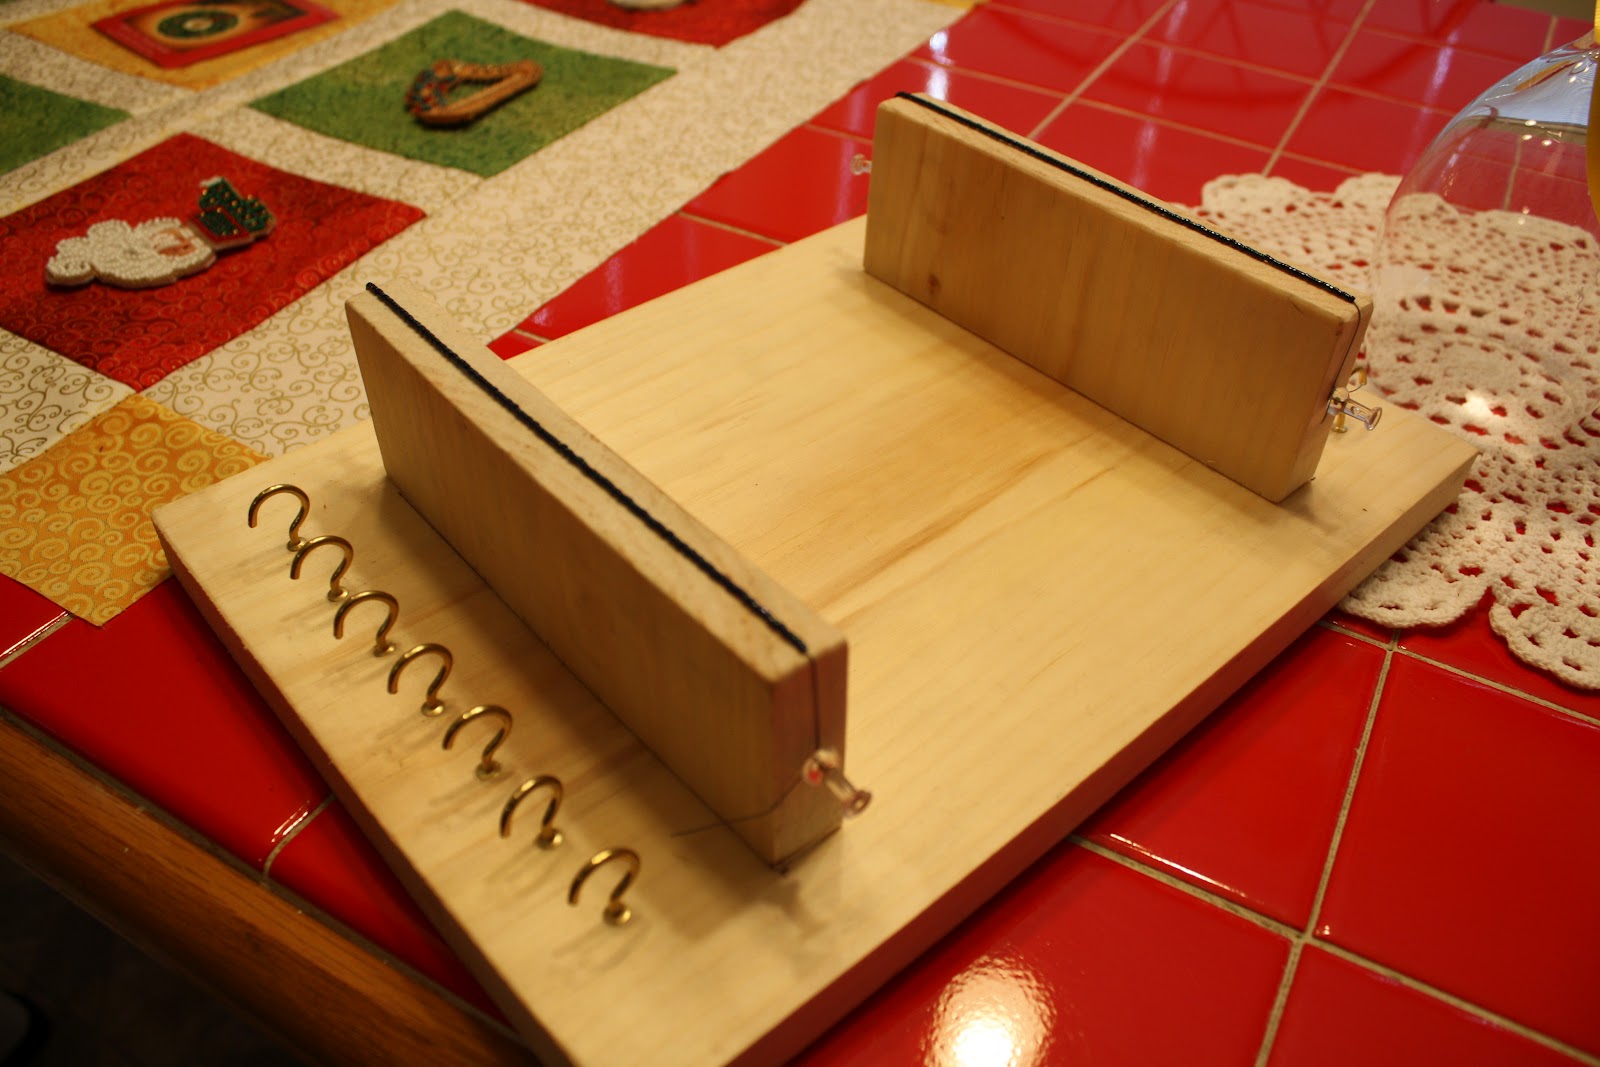
Have you seen these adorable basket kits from Clover? My friend, Lori, at Cotton Fields Quilt Shop sells them. Ruth and I saw them at the sewing expo in Raleigh a few weeks ago and, wanting to support our local quilt shop, asked Lori if she could order them. She did and we've been experimenting. Lori made the bowl and I made the rectangular basket. At the show the sample bowls were made from yarn and from fabric. Haven't tackled one out of fabric yet. But I'm happy with the way this turned out. It doesn't take long to do.This one is about 5 x 7 x 2.5.
Take a few moments to visit Design Wall Monday at Patchwork Times to see what others have on their designs wall.

Monday, July 9, 2012

Design Wall Monday 7-9-12

At the Sewing Expo in Raleigh a couple of weeks ago, I bought a pattern called Talulah by BJ Designs. I was drawn in by the tortoise but because I live along the coast I decided it would better fit in with the ocean-themed art quilts I typically do if it was a sea turtle instead of a tortoise, and by the ocean instead of a lake, and on the beach instead of a desert. So the pattern was my jumping off point.

There is still a lot to do on it. All the tiny pieces of fabrics need to be stitched down, then of course the piece will need to be quilted, and I have some lovely seashells that are size-appropriate for this piece that will find their way onto it. So this is currently on my design table. BJ Designs had a number of really fun animal patterns in bright, happy, and unexpected colors. Worth checking out.


I also picked up a pattern called Hampton's Handbag by Pink Sand Beach Designs and made it this past week. I typically carry a very small purse or pouch, but this bag is a good size and is easy to carry so I'm enjoying using it. I'm making it again using a single summery batik fabric for the outside, pockets and straps, and coordinating fabric for the interior, bag ties, and accents. Lori at Cotton Fields has received a beautiful supply of batiks recently that I positively drool over every time I go to her shop.

At the Expo I also picked up a pattern called The Cross Town Carry Regan's Bag by Marlous Designs that uses fat quarters for assembly and am working on that, as well.

But the highlight of my crafting weekend was Saturday's Artrageous Quilters meeting where a professor of textile art at the local university, Christine Zoller, taught us about loom bead weaving. Wow! Wow! Wow! Her pieces are spectacular. She uses intricately designed and bead woven pieces that are 6 to 7" square in her art quilts. I so enjoyed learning the technique and definitely plan to continue it. This little piece took me every bit of 2 hours to do and is 20 beads wide by 20 rows, so 400 beads in that little piece! Next I think I'll attempt one of the amulet purses that hangs around your neck.

As always, visit Patchwork Times for Design Wall Monday to see what other awesome quilters are working on.